Do you dread having to manually update your customers on the status of their shipments?
With automation, you can set up a system that sends out shipment notifications automatically! This guide will walk you through the process of automating shipment notifications so you can free up time and resources.
With automation, you can set up a system that sends out shipment notifications automatically! This guide will walk you through the process of automating shipment notifications so you can free up time and resources.
1. Decide which kind of notifications you want to send out.
What kind of shipment notifications do you want to send? You might want to include the tracking number, delivery status updates, estimated delivery date, or even just a confirmation of the order being shipped with details about how and where it was sent, who sent it and when.
Depending on your needs, your customers or partners might also require to know the licence plate number of the collection or delivery truck. In addition, they might want to be updated whenever anything in the shipment data changes (like the amount of goods), any documents are added or changed, there is an updated ETA or ETD, and when the shipment is delayed or cancelled. Think carefully about the types of information your customers will find most useful so they can track their orders.
2. Determine Your Notification Sources.
Before you can set up automated shipment notifications, you’ll need to determine the sources of the notifications.
For example, if you are using a third-party shipping and fulfillment provider, they may offer automatic updates on the status of shipments.
Alternatively, if you manage your own shipping and fulfillment processes that involves multiple carriers, you may need to create your own notification system.
Another option is to use a multi-carrier shipping software with notification automation features, which will allow you to set up identical notifications regardless of which carrier is being used for a given shipment. We will take a look into this option in the next chapter. Consider the different options available to you and decide which will work best for your business.
3. Optional: Choose a Multi-Carrier Shipping Software.
When setting up automated shipping notifications, it might be useful to choose a multi-carrier shipping software / transportation management software. Many businesses that are managing their own shipping and fulfillment process, and are using any combination of multiple third-party transport service providers, along with possibly their own fleet, are starting to implement shipping software tools to manage those processes.
A transportation management software is to shipping as an accounting software is to bookkeeping, an ERP is to business operations or a CRM is to sales and customer relations. This software allows these companies to create shipments, calculate shipping prices, request freight quotes, share information between colleagues, track orders, and assign tracking numbers easily, without the hassle of using multiple (or even tens of!) different software tools by different carriers, or using their email software for this purpose. It will also provide the shipment automation rules and triggers which they can define according to their needs.
Research different options and consider how they would fit with your business - be sure to read reviews before making a decision. Download our multi-carrier shipping software checklist to help you in that.
4. Set Up Automation Rules.
Automation rules allow you to set up automated shipment notifications based on certain triggers that you can define. This includes setting up emails to be sent whenever a shipment has been ordered, changed, shipped, delivered or put in transit, among other triggers you can customize. You will also need to define the recipient of each notification, whether it’s yourself, the customer, the collection or delivery contact person, or a designated team member handling shipping updates.
Let’s walk through the process in Cargoson.
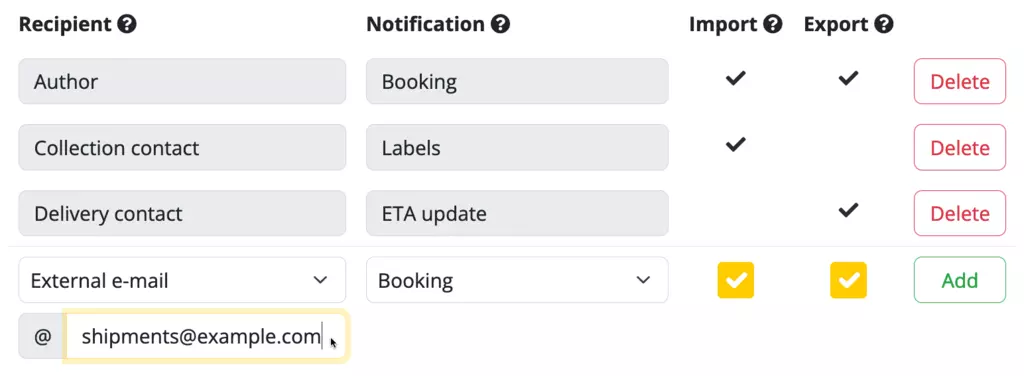
Under Settings, there is a submenu called Notification Settings. Open it you’ll see a simple form with four options for setting up automated shipping notifications:
4.1 Recipient
Firstly, select the person who should receive the notification you’re about to set up.
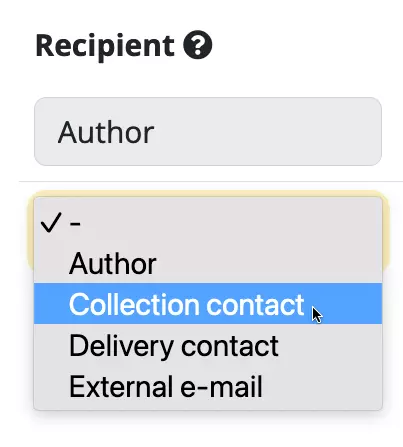
Let's see what the different options mean.
- Author: the person that created the shipment or has been given the responsibility for a shipment. If you’re the only one using the software, it will most likely always be yourself.
- Collection contact: the person that’s been assigned as the contact regarding the loading of goods for a given shipment. For example, it might be the warehouse contact in the loading place, your vendor, customer or even yourself.
- Delivery contact: the person that’s been assigned as the contact regarding the unloading of goods for a given shipment. For example, it might be the warehouse contact in the unloading place, your vendor, customer or even yourself.
- External e-mail: a specific email where the notification that you’re currently setting up will always be sent, regardless of the shipment.
If you want to activate the notification for an external email, just select External e-mail and type the email into the field that appeared.
4.2 Notification type
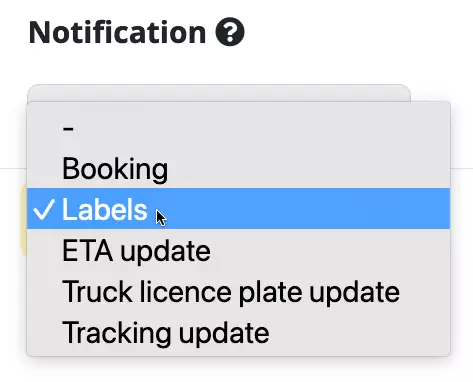
Here you’ll select the trigger and content of the notification. Currently, there are 5 available types:
| Type | Triggered at | Notification content |
|---|---|---|
| Booking | Immediately after a shipment is booked with a carrier |
|
| Shipping labels | Immediately after a shipment is booked with a carrier and the shipping labels are ready |
|
| ETA update |
Whenever the carrier or someone from your company updates any of the following for a booked shipment:
|
|
| Truck licence plate update | Whenever the carrier or someone from your company adds or changes the delivery vehicle licence plate field for a previously booked shipment. |
|
| Tracking status update | Whenever the actual collection date or the actual delivery date was added to a booking, either automatically through the integration with the carrier, or manually by the carrier or yourself. |
|
| Documents update (unlisted, automatically active for every user) | Whenever the carrier added or updated any documents for a booked shipment |
|
4.3 Direction
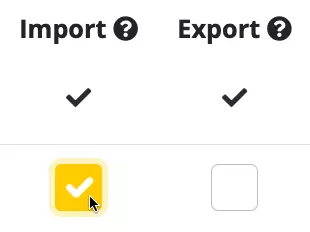
This setting may be a bit tricky to get right at first. In reality, it’s actually pretty simple:
Direction — import
This notification will be triggered on import shipments where the goods are sent from another party to your company (even domestically), and cross-trade shipments (when your company is neither the sender or recipient of the goods).
For example, if you want to send out shipping labels to the collection contact of each shipment, it might make sense to activate this notification for import shipments only. If you activate it for export shipments as well, often times the collection contact will be yourself or someone else from your company, who might not need to receive the labels via a notification.
Direction — export
This notification will be triggered on export shipments where the goods are sent out from your company to your partner/customer/etc.
For example, it might make sense to activate the ETA update notifications for the delivery contact on export shipments only. If you activate it for import shipments as well, often times the delivery contact will be yourself or someone else from your company, who might not need to receive the updated ETA via a notification email.

5. Recommended: Connect Your Shipping Software with your ERP.
If you’ve decided to start using a shipping/TMS software, we strongly recommend you to connect it with your Enterprise Resource Planning (ERP) system. This will enable you to automate the step of getting your customer, partner and shipment data from your ERP to your shipping software as well. This way, no time will be wasted on manual data entry or exchange at all! You’ll be able to automatically send out shipment notifications when orders are created in your ERP, as well as other relevant information such as tracking numbers and delivery dates. Doing this step correctly will save you a great deal of manual work!
Once automated, your team won’t have to manually send out emails anymore - the automation rules will automatically do that based on the triggers you’ve set. The entire process from start to finish can be completed within minutes after it has been properly set up and configured.
Want to learn more about automating your shipment notifications?


